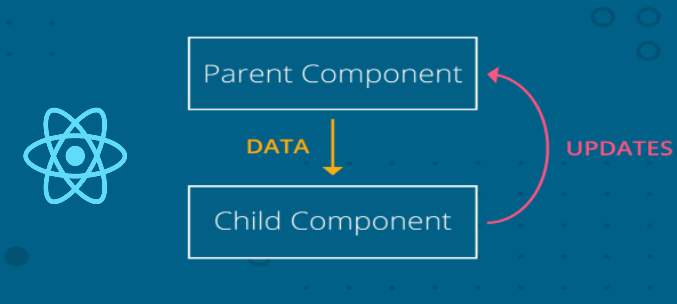
Trong component, khi dữ liệu state hoặc props thay đổi thì sẽ re-render component. Một component con nhận props từ một dữ liệu nào đó của component cha, khi dữ liệu đó thay đổi thì component con sẽ thay đổi theo. Nhưng ngược lại, khi dữ liệu truyền vào được thay đổi bởi component con thì làm sao để component cha có thể biết được và cập nhật theo? Bài viết này sẽ giúp bạn hiểu rõ 2 khái niệm quan trọng trong việc truyền dữ liệu giữa các component.
Khái niệm “top-down-data-flow”
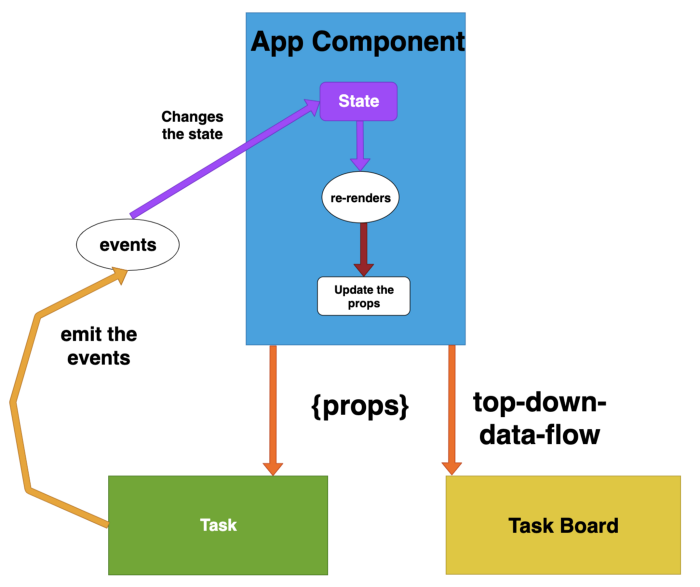
React khuyến khích sử dụng khái niệm “top-down-data-flow” cho tất cả dòng chảy dữ liệu của ứng dụng. Đây là khái niệm thông dụng nhất, khi một component cha truyền dữ liệu cho một component con như một props, khi giá trị của props thay đổi thì component con sẽ được re-render.
Xét ví dụ sau, chúng ta có một state nhận giá trị là props từ component cha và quản lý nó trong chính component con:
Chúng ta tạo một component con Task với các props taskName, status, backgroundColor và ta có thể thay đổi status của công việc đó trong chính component đó. Nếu status thay đổi thì backgroundColor cũng thay đổi theo.
class Task extends React.Component {
  constructor(props) {
    super(props);
    this.state = {
      status: this.props.status,
      showSelection: false,
    };
  }

  handleShowDropdownStatus = () => {
    const showSelection = this.state.showSelection;
    this.setState({ showSelection: !showSelection });
  };

  handleChangeStatus = (e) => {
    this.setState({ status: e });
    this.handleShowDropdownStatus();
  };

  render() {
    let backgroundColor;
    if (this.state.status === "ToDo") {
      backgroundColor = "#d9d9d9";
    } else if (this.state.status === "In Progress") {
      backgroundColor = "#108ee9";
    } else if (this.state.status === "Completed") {
      backgroundColor = "#87d068";
    }

    return (
      <div className="task" style={{ backgroundColor }}>
        <div className="row">Task: {this.props.taskName}</div>
        {!this.state.showSelection ? (
          <div className="row">Status: {this.state.status}</div>
        ) : (
          <div className="row">
            Status:{" "}
            <select onChange={(e) => this.handleChangeStatus(e.target.value)}>
              <option selected={this.state.status === "ToDo"} value="ToDo">
                ToDo
              </option>
              <option
                selected={this.state.status === "In Progress"}
                value="In Progress"
              >
                In Progress
              </option>
              <option
                selected={this.state.status === "Completed"}
                value="Completed"
              >
                Completed
              </option>
            </select>
          </div>
        )}
        <div className="row">
          <button
            className="btnchg"
            onClick={this.handleShowDropdownStatus}
            name="Change Status"
          >
            Change Status
          </button>
        </div>
      </div>
    );
  }
}
Sau đó, ta tạo thêm một function component cha TaskList và truyền vào component con Task các thuộc tính tương ứng làm props của nó:
function TaskList() {
  return (
    <div className="App">
      <h1>Tasks</h1>
      <div className="container">
        <Task taskName="Task 1" status="ToDo" />
        <Task taskName="Task 2" status="In Progress" />
        <Task taskName="Task 3" status="Completed" />
      </div>
    </div>
  );
}
Ở ví dụ này, component cha ListTask gọi 3 conponent con Task và truyền props vào chúng. Component con Task khởi tạo state status với giá trị props truyền vào. Khi chúng ta nhấn nút “Change Status” thì ta sẽ cập nhật lại state với status mới.
Có 2 phương thức handleShowDropdownStatus để hiển thị danh sach status và handleChangeStatus để xử lý sự kiện onChange của dropdown status. Mỗi lần ta cập nhật lại giá trị status của state thì component sẽ re-render.
Khái niệm “Lifting state up”

Yêu cầu của khách hàng không phải lúc nào cũng chốt một lần rồi xong, nhiều lúc họ sẽ thay đổi yêu cầu của mình. Lúc đó ta chỉ có thể chiều lòng khách, và khi đó khái niệm “top-down-data-flow” trên không để đáp ứng mọi yêu cầu của khách hàng. Vì thế, React lại có thêm khái niệm “Lifting state up” (cập nhật dữ liệu của component cha từ component con). Kết hợp 2 khái niệm này, ta sẽ có những logic hoàn hảo để đáp ứng sự thay đổi của khách hàng.
Cũng từ ví dụ trên, khách hàng yêu cầu thêm vài yêu cầu mới. Đó là thêm một công việc mới với nút “+ Add task” và hiển thị một bảng hiển thị tổng số lượng công việc của từng status. Nếu ta thay đổi status của một công việc, thì bảng tổng kết trên đồng thời sẽ cập nhât lại số lượng. Ta làm như sau:
Ta tạo một component Add để tạo nút thêm công việc, nó nhận một props là một hàm onTaskAdd:
const Add = ({ onTaskAdd }) => ( <div className="add" onClick={onTaskAdd}>+ Add task</div>);và một component TaskBoard để hiển thị tổng kết công việc, nó nhận props là số lượng task của từng status: todotasks, progresstasks, completedtasks. Khi giá trị của các props đó thay đổi thì component này cũng sẽ re-render, đây là một “top-down”:
const TaskBoard = ({ todotasks, progresstasks, completedtasks }) => {
  return (
    <div className="taskboard">
      <div className="tsk">
        <span className="left">Todo:</span> {todotasks}
      </div>
      <div className="tsk">
        <span className="left">Prog:</span> {progresstasks}
      </div>
      <div className="tsk">
        <span className="left">Comp:</span> {completedtasks}
      </div>
    </div>
  );
};
Ở ví dụ đầu tiên ta xây dựng component cha ListTask là một function component. Nhưng với yêu cầu mới, ta cần chuyển nó thành class component, ta gọi thêm 2 component mới vừa thêm vào ở trên vào, sau đó khởi tạo state với các dữ liệu cần thiết như sau:
class TaskList extends React.Component {
  constructor(props) {
    super(props);
    this.state = {
      numberOfTasks: 3,
      defaultTask: {
        taskName: "Task",
        status: "ToDo",
      },
      todotasks: 3,
      progresstasks: 0,
      completedtasks: 0,
      tasks: [
        { taskName: "Task 1", status: "ToDo", showSelection: false },
        { taskName: "Task 2", status: "ToDo", showSelection: false },
        { taskName: "Task 3", status: "ToDo", showSelection: false },
      ],
    };
  }

  render() {
    return (
      <div className="App">
        <h1>Tasks</h1>
        <div className="container">
          <Add onTaskAdd={this.onTaskAdd} />
          <TaskBoard
            todotasks={this.state.todotasks}
            progresstasks={this.state.progresstasks}
            completedtasks={this.state.completedtasks}
          />
        </div>
      </div>
    );
  }
}
Bên cạnh đó, ta cũng thay đổi component Task từ class sang function component để nhận các props được truyền vào từ component cha TaskList, khi các giá trị props thay đổi thì component Task sẽ re-render, đây cũng là một “top-down-data-flow”:
const Task = ({
  status,
  taskName,
  showSelection,
  handleChangeStatus,
  handleShowDropdownStatus,
}) => {
  let backgroundColor;
  if (status === "ToDo") {
    backgroundColor = "#d9d9d9";
  } else if (status === "In Progress") {
    backgroundColor = "#108ee9";
  } else if (status === "Completed") {
    backgroundColor = "#87d068";
  }

  return (
    <div className="task" style={{ backgroundColor }}>
      <div className="row">Task: {taskName}</div>
      {!showSelection ? (
        <div className="row">Status: {status}</div>
      ) : (
        <div className="row">
          Status:{" "}
          <select
            onChange={(e) =>
              handleChangeStatus(e.target.value, status, taskName)
            }
          >
            <option selected={status === "ToDo"} value="ToDo">
              ToDo
            </option>
            <option selected={status === "In Progress"} value="In Progress">
              In Progress
            </option>
            <option selected={status === "Completed"} value="Completed">
              Completed
            </option>
          </select>
        </div>
      )}
      <div className="row">
        <button
          className="btnchg"
          onClick={(e) => handleShowDropdownStatus(e, taskName)}
          name="Change Status"
        >
          Change Status
        </button>
      </div>
    </div>
  );
};
Lúc này, 2 phương thức handleChangeStatus và handleShowDropdownStatus được truyền vào như một props, và ngược lại các giá trị lấy từ event onClick và onChange cũng được truyền ra ngoài (truyền lên) component cha để xử lý. Quá trình này được gọi là “Lifting State Up”.
Ta viết 2 phương thức trên ở component cha TaskList như sau:
handleShowDropdownStatus = (e, taskName) => {
    const showSelection = this.state.showSelection;
    console.log(taskName);
    this.state.tasks.forEach((task) => {
      if (task.taskName === taskName) {
        task.showSelection = true;
      }
    });
    this.setState({
      showSelection: !showSelection,
      tasks: [...this.state.tasks],
    });
  };

handleChangeStatus = (status, existingStatus, taskName) => {
    this.state.tasks.forEach((task) => {
      if (task.taskName === taskName) {
        task.status = status;
        task.showSelection = false;
      }
    });
    let todotasks = this.state.todotasks;
    let progresstasks = this.state.progresstasks;
    let completedtasks = this.state.completedtasks;

    if (status === "ToDo") todotasks = todotasks + 1;
    if (status === "In Progress") progresstasks = progresstasks + 1;
    if (status === "Completed") completedtasks = completedtasks + 1;
    if (existingStatus === "ToDo") todotasks = todotasks - 1;
    if (existingStatus === "In Progress") progresstasks = progresstasks - 1;
    if (existingStatus === "Completed") completedtasks = completedtasks - 1;
    this.setState({
      tasks: [...this.state.tasks],
      todotasks,
      progresstasks,
      completedtasks,
    });
};
Tiếp theo, phần render component Task ta sẽ dùng hàm forEach() để duyệt giá trị tasks của state được khai báo trong phần khởi tạo state và gọi nó ở phần render() như sau:
render() {
    let taskProps = [];
    const tasks = [...this.state.tasks];
    tasks.forEach((task, index) => {
      taskProps.push(
        <Task
          key={index}
          taskName={task.taskName}
          status={task.status}
          handleShowDropdownStatus={this.handleShowDropdownStatus}
          handleChangeStatus={this.handleChangeStatus}
          showSelection={task.showSelection}
        />
      );
    });

    return (
      <div className="App">
        <h1>Tasks</h1>
        <div className="container">
          <Add onTaskAdd={this.onTaskAdd} />
          <TaskBoard
            todotasks={this.state.todotasks}
            progresstasks={this.state.progresstasks}
            completedtasks={this.state.completedtasks}
          />
        </div>
        <div className="container">{taskProps}</div>
      </div>
    );
  }
Tương tự ở component Add trên ta thấy nó cũng nhận một hàm onTaskAdd như một props, và event onClick ở component con này sẽ được xử lý ở bên ngoài component cha TaskList, nên ở đây cũng có một “Lifting State Up”:
  onTaskAdd = () => {
    const numberOfTasks = this.state.numberOfTasks;
    const todotasks = this.state.todotasks;
    const tasks = this.state.tasks;
    tasks.push({
      taskName: "Task " + numberOfTasks + 1,
      status: "ToDo",
      showSelection: false,
    });
    this.setState({
      numberOfTasks: numberOfTasks + 1,
      todotasks: todotasks + 1,
      tasks,
    });
};Tổng kết

Thường thì, state là cái đầu tiên cần quản lý. Nếu các component khác cũng cần chung một state, thì ta cần chuyển nó lên component cha gần nhất của chúng, thay vì phải xử lý các state riêng lẻ ở các component.
Hai khái niệm “top-down-data-flow” và “Lifting State Up” bổ trợ lẫn nhau, giảm bớt các lỗi không cần thiết.
Bài viết có tham khảo thông tin từ link: https://medium.com/bb-tutorials-and-thoughts/what-is-called-lifting-state-up-in-react-785d52da940a


